NextDNS Setup Guide: Block Ads and Trackers for Ultimate Online Privacy
NextDNS is a powerful tool that helps you block ads and trackers, enhancing your online privacy. This guide will walk you through the setup process and show you how to get the most out of this service.
NextDNS is a cloud-based DNS service that allows you to block ads, trackers, and malicious websites. It's like a firewall for your internet connection, protecting you from unwanted content and potential threats. I've been using NextDNS for a while now, and I can say it's one of the best tools for improving online privacy.
Setting up NextDNS is straightforward. First, you need to create an account on their website. Then, you'll get a unique DNS address that you can use on your devices. Here's a step-by-step guide:
-
Go to the NextDNS website and sign up for an account.
-
Once you're logged in, you'll see your DNS address. It should look something like '12345.dns.nextdns.io'.
-
Now, you need to configure your device to use this DNS address. The process varies depending on the device, but generally, you can find the DNS settings in your network preferences.
For example, on a Windows PC, you can go to Control Panel > Network and Internet > Network and Sharing Center > Change adapter settings. Then, right-click on your network connection, select Properties, and double-click on Internet Protocol Version 4 (TCP/IPv4). Finally, select 'Use the following DNS server addresses' and enter your NextDNS address.
On a smartphone, you can usually find the DNS settings in the Wi-Fi settings. For instance, on an iPhone, go to Settings > Wi-Fi, tap on the 'i' icon next to your network, and then tap on 'Configure DNS'. Select 'Manual' and add your NextDNS address.
-
After configuring the DNS, you can test it by visiting the NextDNS website. They have a test page that will confirm if your device is using their service.
-
Finally, you can customize your NextDNS settings to block specific types of content, such as ads, trackers, or adult websites. You can also set up parental controls or block specific websites.
I remember when I first set up NextDNS, I was amazed at how easy it was. Within minutes, I had it running on all my devices, and I could see the difference immediately. The ads were gone, and my browsing felt faster and more secure.
One of the main benefits of using NextDNS is the ability to block ads and trackers. This not only improves your browsing experience by removing annoying ads but also enhances your privacy by preventing trackers from collecting your data. I've noticed a significant decrease in targeted ads since I started using NextDNS.
Another advantage is the protection against malicious websites. NextDNS uses threat intelligence to block known malware and phishing sites, keeping your devices safe from potential threats. This is especially important if you have children or elderly family members who might not be as tech-savvy.
Moreover, NextDNS allows you to customize your settings based on your needs. You can choose which types of content to block, set up schedules for certain restrictions, or even create different profiles for different devices. For example, I have a profile for my work devices that blocks social media sites during working hours to help me stay focused.
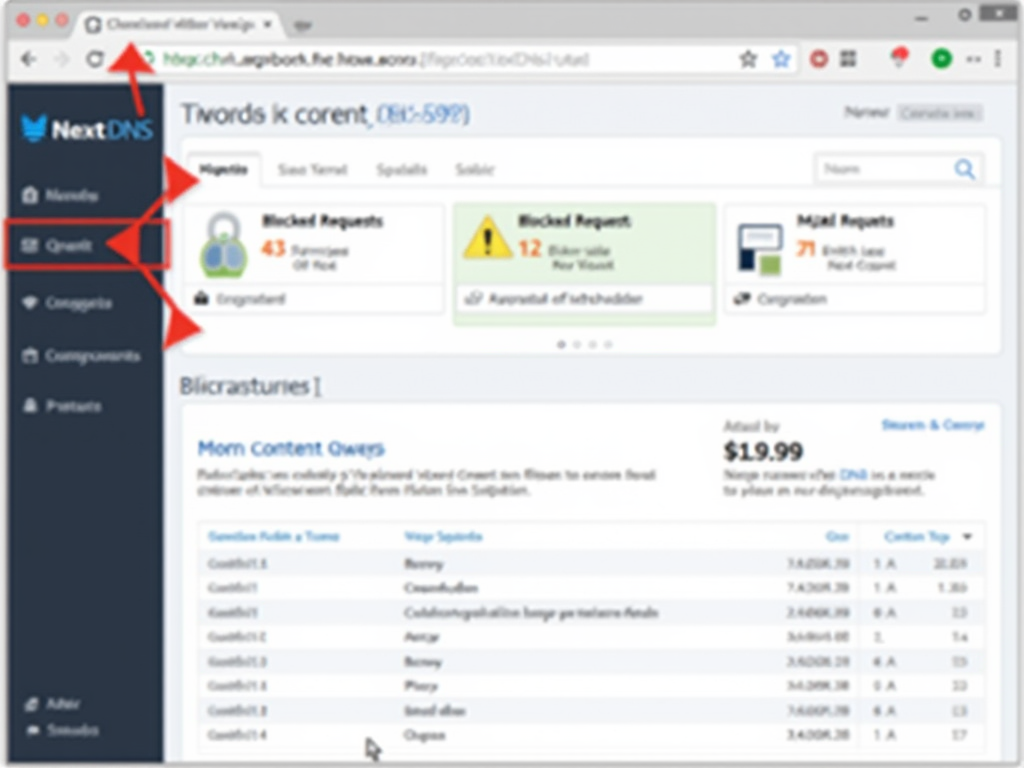
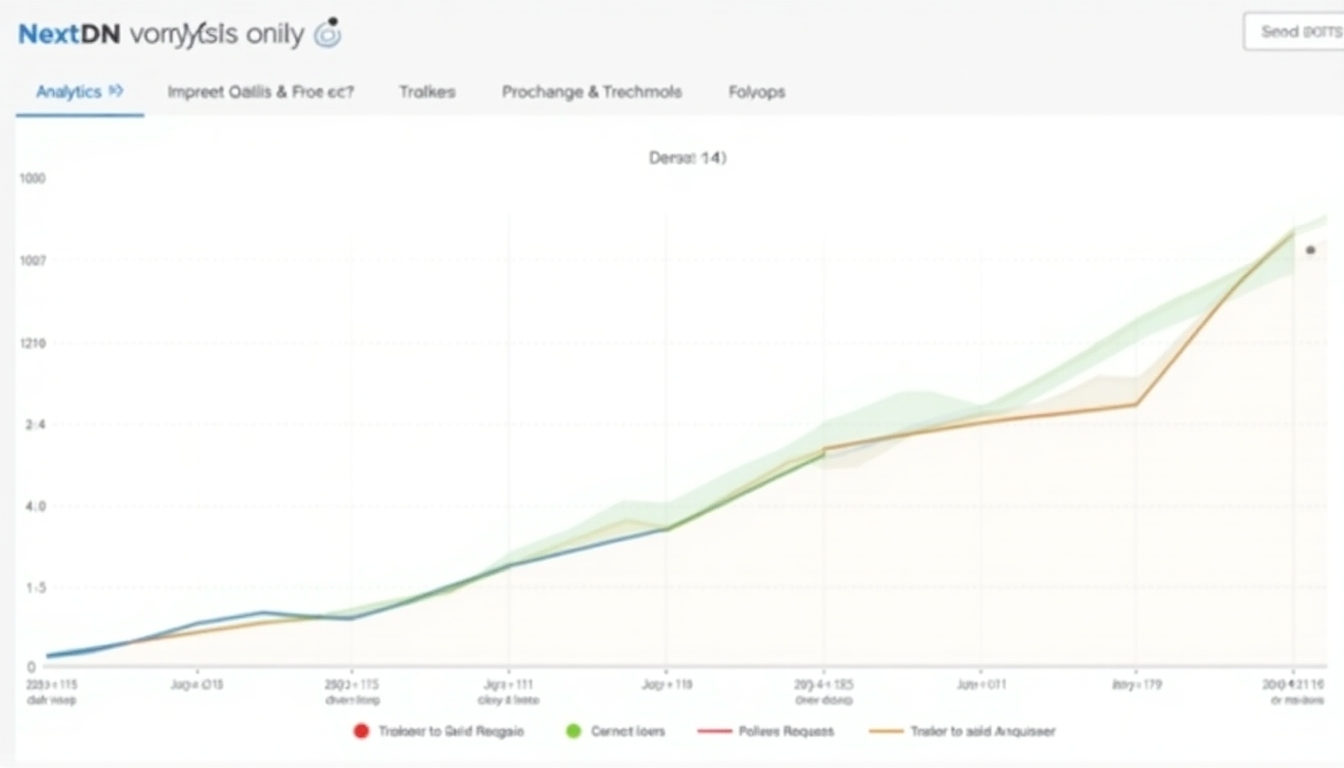
I also appreciate the analytics feature, which shows you detailed statistics about your DNS queries. You can see how many requests were blocked, which domains were accessed the most, and even the geographic distribution of the servers handling your requests. It's fascinating to see how much data is being processed and how much is being blocked.
Here are some tips to help you get the most out of NextDNS:
-
Customize your blocklists: NextDNS comes with default blocklists, but you can add more to suit your needs. For example, if you want to block specific websites or types of content, you can search for relevant blocklists and add them to your configuration.
-
Use the 'Allow' list: If you find that NextDNS is blocking a website you need to access, you can add it to the 'Allow' list. This will ensure that the website is not blocked, even if it's on a blocklist.
-
Set up parental controls: If you have children, you can use NextDNS to set up parental controls. You can block adult content, set time limits for certain websites, or even block entire categories of websites.
-
Monitor your analytics: Regularly check your analytics to see what's being blocked and adjust your settings accordingly. This can help you fine-tune your configuration for better performance and privacy.
-
Use NextDNS on all your devices: To get the most benefit, make sure to set up NextDNS on all your devices, including smartphones, tablets, and computers. You can also set it up on your router to cover all devices connected to your home network.
I learned these tips through trial and error. At first, I had some websites that I needed to access being blocked, but once I added them to the 'Allow' list, everything worked perfectly. Also, setting up NextDNS on my router was a game-changer, as it protected all devices in my home without having to configure each one individually.
In conclusion, NextDNS is an excellent tool for blocking ads and trackers, enhancing your online privacy, and protecting your devices from malicious websites. With its easy setup process and customizable settings, it's suitable for both beginners and advanced users. By following this guide, you can set up NextDNS on your devices and start enjoying a safer, more private browsing experience.