How to Spot and Stop DNS Leaks: A Comprehensive Guide
The internet relies on the Domain Name System (DNS) to translate human-friendly domain names, like www.example.com, into IP addresses that computers can understand. When you type a URL into your browser, your device sends a DNS request to a DNS server to get the corresponding IP address.
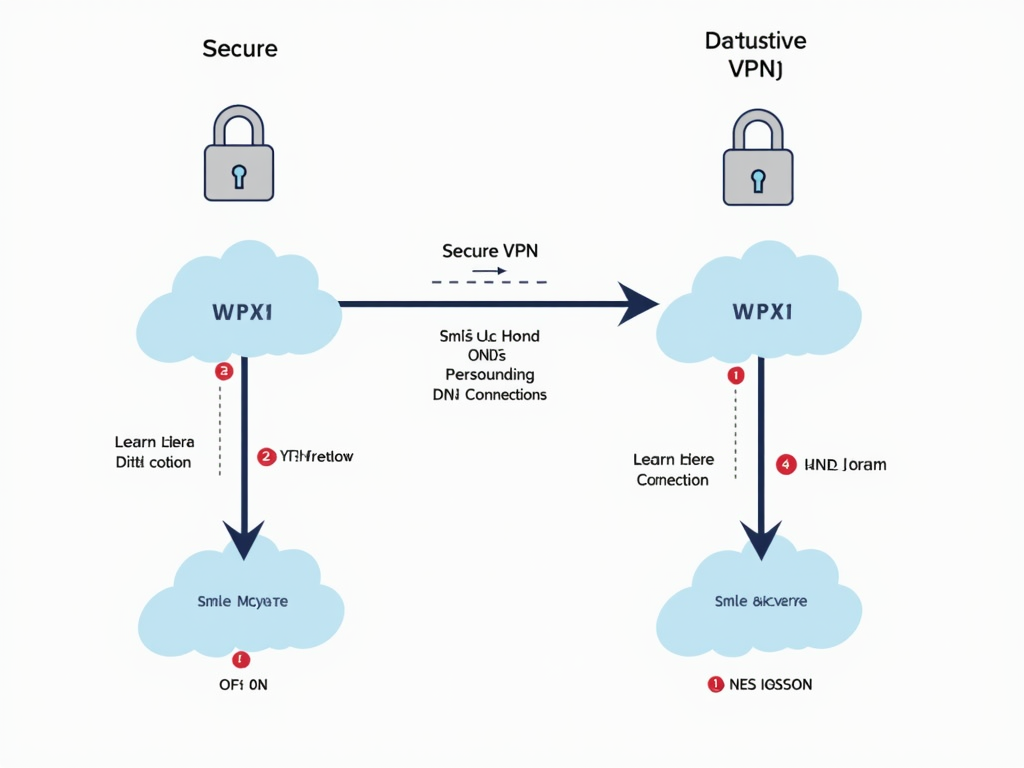
Virtual Private Networks (VPNs) are tools used to enhance online privacy and security. They create an encrypted tunnel between your device and the VPN server, hiding your IP address and encrypting your internet traffic. This prevents your Internet Service Provider (ISP) and other third parties from seeing your online activities.
However, even when using a VPN, there's a potential privacy risk known as a DNS leak. In this guide, we'll explore what DNS leaks are, why they matter, and most importantly, how to spot and stop them to protect your online privacy.
What are DNS Leaks?
A DNS leak occurs when your DNS requests are sent outside of the VPN tunnel, typically to your ISP's DNS servers, instead of through the VPN's DNS servers. This can happen due to various reasons, such as misconfigured VPN settings, issues with the VPN client, or even malware on your device.
When a DNS leak happens, your ISP or anyone monitoring your network can see the domains you're visiting, even if your actual traffic is encrypted by the VPN. This defeats one of the main purposes of using a VPN for privacy.
In a study by Stanford University, researchers found that DNS leaks are a common issue among VPN users, often due to misconfigured settings.
Why are DNS Leaks a Problem?
DNS leaks compromise your online privacy by exposing your browsing history. Even if your traffic is encrypted, the DNS requests reveal the websites you're visiting. This information can be used to track your online activities, target you with ads, or even censor your internet access.
Moreover, in some cases, DNS leaks can reveal your true IP address, further compromising your anonymity. For individuals who rely on VPNs to protect their identity, such as journalists, activists, or people living under repressive regimes, DNS leaks can have serious consequences.
Common Causes of DNS Leaks
DNS leaks can occur for several reasons, including:
- Misconfigured VPN Settings: If the VPN client is not set up correctly, it might not route DNS requests through the VPN tunnel.
- VPN Client Issues: Bugs or glitches in the VPN software can lead to DNS leaks.
- Operating System Settings: Some operating systems have default settings that can cause DNS requests to bypass the VPN.
- Malware or Compromised Devices: Malicious software can alter DNS settings, leading to leaks.
- IPv6 Leaks: If your VPN doesn't support IPv6 and your device is using it, DNS requests might leak over IPv6.
Understanding these causes can help you troubleshoot and prevent DNS leaks more effectively.
How to Spot DNS Leaks
Detecting DNS leaks is crucial to ensure your VPN is working as intended. There are several methods to check for DNS leaks:
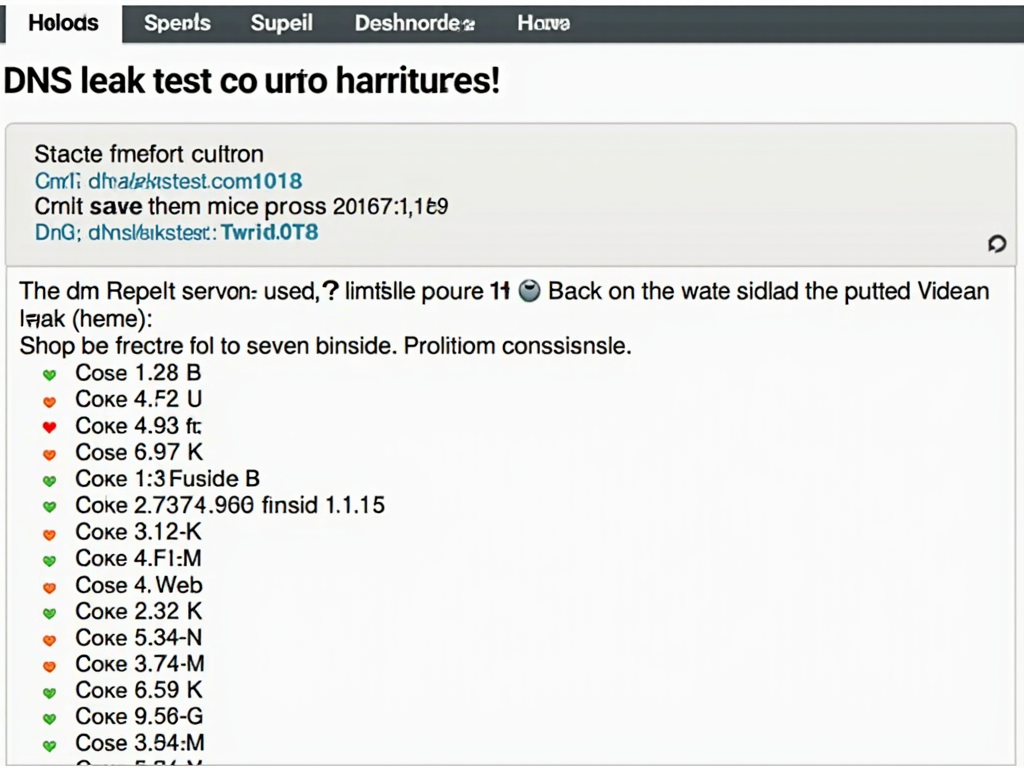
- Online DNS Leak Test Tools: Websites like dnsleaktest.com or ipleak.net allow you to run a test that checks which DNS servers your device is using. If the test shows your ISP's DNS servers instead of your VPN's, you have a DNS leak.
- Check VPN Client Settings: Most VPN clients have options to prevent DNS leaks. Ensure that features like 'DNS leak protection' or 'Use VPN DNS servers' are enabled.
- Manual Inspection: On Windows, you can use the command prompt to check your DNS settings. Run 'ipconfig /all' and look for the DNS servers listed. If they belong to your ISP, there might be a leak.
- Browser Extensions: Some browser extensions can detect and alert you to DNS leaks.
Regularly testing for DNS leaks is a good practice, especially after changing VPN settings or updating your VPN client.
How to Stop DNS Leaks
Preventing DNS leaks involves configuring your VPN and device settings correctly. Here are some steps to stop DNS leaks:
- Choose a Reliable VPN: Not all VPNs are created equal. Select a VPN provider that offers strong DNS leak protection features.
- Enable DNS Leak Protection: In your VPN client, make sure that DNS leak protection is enabled. This feature ensures that all DNS requests are routed through the VPN tunnel.
- Use VPN's DNS Servers: Configure your device to use the DNS servers provided by your VPN. This can usually be done within the VPN client's settings.
- Disable IPv6: Sometimes, DNS leaks occur over IPv6. If your VPN doesn't support IPv6, disabling it on your device can prevent leaks.
- Use a Firewall: Configure your firewall to block all internet traffic that doesn't go through the VPN. This can prevent DNS requests from bypassing the VPN tunnel.
- Regularly Test for Leaks: As mentioned earlier, periodically check for DNS leaks to ensure your setup is secure.
According to Krebs on Security, using a VPN with built-in DNS leak protection is one of the most effective ways to prevent leaks.
Using Mullvad's DNS over VPN
Mullvad is a privacy-focused VPN service that offers a feature called 'DNS over VPN.' This feature ensures that all your DNS requests are handled by Mullvad's own DNS servers, which are designed to protect your privacy.
To use Mullvad's DNS over VPN:
- Sign Up for Mullvad: First, you need an account with Mullvad VPN.
- Download and Install the Client: Mullvad provides clients for various platforms, including Windows, macOS, Linux, iOS, and Android.
- Enable DNS over VPN: In the Mullvad client, go to the settings and ensure that 'Always require VPN' and 'Block ads, trackers, and malware' are enabled. These settings help in routing DNS requests through Mullvad's servers.
- Verify the Setup: After connecting to the VPN, use a DNS leak test tool to confirm that your DNS requests are going through Mullvad's servers.
For more information on Mullvad's DNS over VPN feature, check out their official documentation.

Additional Tips for Online Privacy
While preventing DNS leaks is crucial, there are other steps you can take to enhance your online privacy:
- Use Encrypted DNS: Services like DNS over HTTPS (DoH) or DNS over TLS (DoT) encrypt your DNS requests, adding an extra layer of security.
- Browser Privacy Settings: Configure your browser to block trackers, use private browsing modes, and clear cookies regularly.
- Avoid Public Wi-Fi: Public Wi-Fi networks are often insecure. If you must use them, always connect through a VPN.
- Keep Software Updated: Ensure your operating system, VPN client, and other software are up to date to protect against vulnerabilities.
- Use Two-Factor Authentication: Enable 2FA on your accounts to add an extra layer of security.
By combining these practices with DNS leak prevention, you can significantly improve your online privacy.
Conclusion
In today's digital age, protecting your online privacy is more important than ever. DNS leaks can undermine the effectiveness of your VPN, exposing your browsing activities to unwanted eyes. By understanding what DNS leaks are, how to spot them, and how to stop them, you can take control of your online privacy.
Remember to regularly test for DNS leaks, especially after making changes to your VPN settings. Using a reputable VPN service like Mullvad, which offers robust DNS leak protection, can also help safeguard your privacy.
Stay vigilant, and make online privacy a priority.